So many new features came up in April release but the one I was very excited about was creating custom controls using PowerApp Component Framework. If you are not sure what custom control is please read this article.
I am documenting my experience of developing the custom controls (end-to-end) in this blog.
Prepare your development environment
Installations
- Install npm from here. NTS or Current – any version of npm will do
- If you don’t have Visual Studio 2017 then download and install VS2017
- Download and Install PowerApp CLI on your machine from here
Currently PowerApps CLI is supported only on Windows 10
Create & configure PowerApp Component Framework components
- Create or identify your working folder. In my case it is “C:\Users\dnaglekar\Source\Workspaces\xxx\PowerAppCustomControl”
- Open Visual Studio command prompt
- Navigate to you recently created folder (step 1) using
cdcommand. In my case it iscd C:\Users\dnaglekar\Source\Workspaces\xxx\PowerAppCustomControl - Run the
paccommand to create new component project. Command is as follows:pac pcf init --namespace [Your Namespace] --name [Your Component Name] --template [Component Type]
In my case, following is the
paccommand:pac pcf init --namespace DanzMaverick --name Tags --template field
As of today there are two component types: field and dataset.
- Now we want to retrieve all project dependencies. To do that we want to run the following command:
npm install
Develop custom control
Now that the project is ready; navigate in your project folder. You can use any development tool to implement your custom control. I have used Visual Studio 2017. Below are the steps to be followed to successfully develop your control.
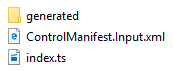
Following will be the file structure you will find after all project dependencies are installed.

As you can see there is one folder named “Tags” (you will see different folder as per the name of your control), that was the name of the control I gave in my pac command. Navigate inside that particular folder and you will find the following structure.
Configure Manifest file
ControlManifest.Input.xml
This is a very important file. It contains the component’s definition. Open this file in your favorite developer interface.
First thing you would need to change in this file is the definition of the custom control. You will see an example configuration with a tag named “control” – shown below:
<control namespace="DanzMaverick" constructor="Tags" version="0.0.1" display-name-key="Control_Display_Key" description-key="Control_Desc_Key" control-type="standard">
- namespace: this was provided earlier in the
paccommand - constructor: this is the name of your control that you had provided in the
paccommand - version: change it if needed; else keep what is
- display-name-key: change it to be the display name (no spaces) of your custom control
- description-key: change it to be the description of your custom control that you want to show in D365
- control-type: do not change this
Next you will find is a tag named “property” – shown below:
<property name="sampleProperty" display-name-key="Property_Display_Key" description-key="Property_Desc_Key" of-type="SingleLine.Text" usage="bound" required="true" />
Following are the attributes of property tag:
- name: change it to be the name of your control
- display-name-key: change it to be the display name (no spaces) of your custom control
- description-key: change it to be the description of your custom control that you want to show in D365
- of-type: if your control is going to support only single data-type then use of-type attribute.
Valid values are:- Currency
- DateAndTime.DateAndTime
- DateAndTime.DateOnly
- Decimal
- Enum
- FP
- Multiple
- Optionset
- SingleLine.Email
- SingleLine.Phone
- SingleLine.Text
- SingleLine.TextArea
- SingleLine.Ticker
- SingleLine.URL
- TwoOptions
- Whole.None
More information about of-type values is here
- of-type-group: if your control is going to support multiple data-type then use of-type-group attribute. If you use this attribute then you have to define the type-group tag and the name of that type-group should be mentioned here.
Below is a sample for defining a type-group:<type-group name="numbers"> <type>Whole.None</type> <type>Currency</type> <type>FP</type> <type>Decimal</type> </type-group>
After you configured control and property tags; you should move towards the end of manifest file. You’ll find resource tag. This tag lists three type of child tags; code, css & resx.
- code: it contains the relative path to the typescript file that will contain the code for our custom control
- css: it contains the relative path of the css file that our custom control will use while rendering the controls
- resx: it contains the relative path of resx file that will contain localized string
Make sure that if you are referencing relative path; it is correct
My final manifest file looks like below:
<?xml version="1.0" encoding="utf-8" ?>
<manifest>
<control namespace="DanzMaverick" constructor="Tags" version="0.0.1" display-name-key="DanzMaverick.Tags" description-key="Takes your comma separated string and converts it into Tags" control-type="standard">
<!-- property node identifies a specific, configurable piece of data that the control expects from CDS -->
<type-group name="forTags">
<type>SingleLine.Text</type>
<type>SingleLine.TextArea</type>
</type-group>
<property name="Tags" display-name-key="Tags" description-key="Tags" of-type-group="forTags" usage="bound" required="true" />
<!--
Property node's of-type attribute can be of-type-group attribute.
Example:
<type-group name="numbers">
  <type>Whole.None</type>
  <type>Currency</type>
  <type>FP</type>
  <type>Decimal</type>
 </type-group>
<property name="sampleProperty" display-name-key="Property_Display_Key" description-key="Property_Desc_Key" of-type-group="numbers" usage="bound" required="true" />
-->
<resources>
<code path="index.ts" order="1"/>
<css path="css/index.css" order="1" />
<!-- UNCOMMENT TO ADD MORE RESOURCES
<css path="css/Tags.css" order="1" />
<resx path="strings/Tags.1033.resx" version="1.0.0" />
-->
</resources>
</control>
</manifest>
Implement logic in typescript
First open the index.ts file in your favorite development tool. I am using Visual Studio 2017. You will find following methods:
- init: this will be the first method that system will invoke. All your design should happen in this method
- updateView: this method is invoked when property bag is changed; which includes fields, data-sets, global variables such as height and/or width
- getOutputs: this method is called prior to receiving any data
- destroy: add your cleanup code here
In my case as I am creating a control to read a comma-separated value in the text field and create tag-like elements. So follow along with manipulating the index.ts file.
HTML Elements
Let’s start by adding HTML elements we need. As we are writing a .ts file we do not have HTML tags (per say). But using the power of typescript we are going to create dynamic HTML elements in the form of variables and later use them in the init function to add it on the control.
import { IInputs, IOutputs } from "./generated/ManifestTypes";

export class Tags implements ComponentFramework.StandardControl {

/**
* Variables for HTML element
*/
private tagsElement: HTMLElement;
private spaceElement: HTMLElement;
private refreshButton: HTMLElement;
I have added an element for my tags and space. I have also added a button for refresh. I am going for the following look & feel.

Global Variables
Now that I have decided what all HTML elements I need; let’s decide all variables I may need during the implementation process. I have decided I will need a variable to store the value that will contain a comma-separated string. So adding to the above code tagsString will be the variable that will contain the attribute value.
import { IInputs, IOutputs } from "./generated/ManifestTypes";

export class Tags implements ComponentFramework.StandardControl {

/**
* Variables for HTML element
*/
private tagsElement: HTMLElement;
private spaceElement: HTMLElement;
private refreshButton: HTMLElement;

/**
* Variables for Properties
*/
private tagsString: string;
As I said it is not an HTML so we have to define variable for all. Hence, let’s define variable for event listener for the “refresh button”. Adding to the same code and expanding it – “refreshClicked” will be my event listener when “Refresh” button is clicked.
import { IInputs, IOutputs } from "./generated/ManifestTypes";

export class Tags implements ComponentFramework.StandardControl {

/**
* Variables for HTML element
*/
private tagsElement: HTMLElement;
private spaceElement: HTMLElement;
private refreshButton: HTMLElement;
private divElement: HTMLElement;

/**
* Variables for Properties
*/
private tagsString: string;

/**
* Variables for Event Listener
*/
private refreshClicked: EventListenerOrEventListenerObject;
We also need some local variable to capture the input parameter from init function. Expanding the code; it looks like below.
import { IInputs, IOutputs } from "./generated/ManifestTypes";

export class Tags implements ComponentFramework.StandardControl {

/**
* Variables for HTML element
*/
private tagsElement: HTMLElement;
private spaceElement: HTMLElement;
private refreshButton: HTMLElement;
private divElement: HTMLElement;

/**
* Variables for Properties
*/
private tagsString: string;

/**
* Variables for Event Listener
*/
private refreshClicked: EventListenerOrEventListenerObject;

/**
* Local Variables
*/
private localContext: ComponentFramework.Context;
private localNotifyOutputChanged: () => void;
private localContainer: HTMLDivElement;
init() function
In this function, let’s first initialize local variables from the input parameters. Then create a functions to handle events; in my case, I have created refreshClick() function. Now, bind the event handlers to the variables defined for event listening.
From here onward the logic to add the HTML elements may defer based on the logic, in my case, I am adding refresh button first to the body of the control; to do so I have written the below code.
// Refresh button
this.refreshButton = document.createElement("button");
this.refreshButton.setAttribute("type", "button");
this.refreshButton.setAttribute("value", "Refresh");
this.refreshButton.setAttribute("class", "btn btn-default btn-sm glyphicon glyphicon-refresh");
this.refreshButton.addEventListener("click", this.refreshClick);

// Add elements to container
this.localContainer.appendChild(this.refreshButton);
Here, I initialized my variable as input tag using document.createElement. Then I defined some attributes to that tag; in this case, type & value. Later, I added the event listener to that element. Finally, I add my element to the div container.
Now, I read the attribute value bound to the control from the context, split the values based on comma and in the for-loop I initialize my tags tag as span HTML element and set class attributes on that element.
Below is my entire init() function
/**
* Used to initialize the control instance. Controls can kick off remote server calls and other initialization actions here.
 * Data-set values are not initialized here, use updateView.
 * @param context The entire property bag available to control via Context Object; It contains values as set up by the customizer mapped to property names defined in the manifest, as well as utility functions.
 * @param notifyOutputChanged A callback method to alert the framework that the control has new outputs ready to be retrieved asynchronously.
 * @param state A piece of data that persists in one session for a single user. Can be set at any point in a controls life cycle by calling 'setControlState' in the Mode interface.
 * @param container If a control is marked control-type='starndard', it will receive an empty div element within which it can render its content.
 */
public init(context: ComponentFramework.Context, notifyOutputChanged: () => void, state: ComponentFramework.Dictionary, container: HTMLDivElement) {
 // Init local variables
 this.localContext = context;
 this.localNotifyOutputChanged = notifyOutputChanged;
 this.localContainer = container;

 // Register EventHandler
 this.refreshClicked = this.refreshClick.bind(this);

 // Refresh button
 this.refreshButton = document.createElement("button");
 this.refreshButton.setAttribute("type", "button");
 this.refreshButton.setAttribute("value", "Refresh");
 this.refreshButton.setAttribute("class", "btn btn-default btn-sm glyphicon glyphicon-refresh");
 this.refreshButton.addEventListener("click", this.refreshClick);

 // Add elements to container
 this.localContainer.appendChild(this.refreshButton);

 // @ts-ignore
 var crmTagStringsAttributeValue =  context.parameters.Tags.raw;
 var data = crmTagStringsAttributeValue.split(",");

 for (var i in data) {
 // Create controls
 // Tag element
 this.tagsElement = document.createElement("span");
 this.tagsElement.setAttribute("class", "badge badge-pill badge-primary");
 var ele = this.localContainer.appendChild(this.tagsElement);
 ele.innerHTML = data[i];

 // Space element
 this.spaceElement = document.createElement("span");
 var space = this.localContainer.appendChild(this.spaceElement);
 space.innerHTML = "  ";
 }
}
Below is my refreshClick() function
/**
* Custom Event Handlers
 */
public refreshClick(evnt: Event): void {
	this.localNotifyOutputChanged();
}
updateView() function
In here, we need to refresh the HTML elements based on the new data entered on the screen.
Below is my updateView() function
/**
* Called when any value in the property bag has changed. This includes field values, data-sets, global values such as container height and width, offline status, control metadata values such as label, visible, etc.
 * @param context The entire property bag available to control via Context Object; It contains values as set up by the customizer mapped to names defined in the manifest, as well as utility functions
 */
public updateView(context: ComponentFramework.Context): void {
 // Add code to update control view

        // @ts-ignore
        var crmTagStringsAttributeValue =  // @ts-ignore
 var crmTagStringsAttributeValue =  context.parameters.Tags.raw != null ?  context.parameters.Tags.raw : "red,green,blue";
        var data = crmTagStringsAttributeValue.split(",");

        // Delete all elements first
        var tagCollection = this.localContainer.getElementsByTagName("span");
        var loopLength = tagCollection.length;
        for (var ti = 0; ti < loopLength; ti++) {
            this.localContainer.removeChild(tagCollection[0]);
        }

        // Add new tags
        for (var i in data) {
            // Create controls
            // Tag element
            this.tagsElement = document.createElement("span");
            this.tagsElement.setAttribute("class", "badge badge-pill badge-primary");

            var ele = this.localContainer.appendChild(this.tagsElement);
            ele.innerHTML = data[i];

            // Space element
            this.spaceElement = document.createElement("span");

            var space = this.localContainer.appendChild(this.spaceElement);
            space.innerHTML = "  ";
        }
}
Use // @ts-ignore to use Xrm.Page module
My entire index.ts code file
import { IInputs, IOutputs } from "./generated/ManifestTypes";

export class Tags implements ComponentFramework.StandardControl {

    /**
     * Variables for HTML element
     */
    private tagsElement: HTMLElement;
    private spaceElement: HTMLElement;
    private refreshButton: HTMLElement;
    private divElement: HTMLElement;

    /**
     * Variables for Properties
     */
    private tagsString: string;

    /**
     * Variables for Event Listener
     */
    private refreshClicked: EventListenerOrEventListenerObject;

    /**
     * Local Variables
     */
    private localContext: ComponentFramework.Context;
    private localNotifyOutputChanged: () => void;
    private localContainer: HTMLDivElement;

	/**
	 * Empty constructor.
	 */
    constructor() {

    }

    /**
	 * Used to initialize the control instance. Controls can kick off remote server calls and other initialization actions here.
	 * Data-set values are not initialized here, use updateView.
	 * @param context The entire property bag available to control via Context Object; It contains values as set up by the customizer mapped to property names defined in the manifest, as well as utility functions.
	 * @param notifyOutputChanged A callback method to alert the framework that the control has new outputs ready to be retrieved asynchronously.
	 * @param state A piece of data that persists in one session for a single user. Can be set at any point in a controls life cycle by calling 'setControlState' in the Mode interface.
	 * @param container If a control is marked control-type='starndard', it will receive an empty div element within which it can render its content.
	 */
    public init(context: ComponentFramework.Context, notifyOutputChanged: () => void, state: ComponentFramework.Dictionary, container: HTMLDivElement) {
        // Init local variables
        this.localContext = context;
        this.localNotifyOutputChanged = notifyOutputChanged;
        this.localContainer = container;

        // Register EventHandler
        this.refreshClicked = this.refreshClick.bind(this);

        // Refresh button
        this.refreshButton = document.createElement("button");
        this.refreshButton.setAttribute("type", "button");
        this.refreshButton.setAttribute("value", "Refresh");
        this.refreshButton.setAttribute("class", "btn btn-default btn-sm glyphicon glyphicon-refresh");
        this.refreshButton.addEventListener("click", this.refreshClick);

        // Add elements to container
        this.localContainer.appendChild(this.refreshButton);

        // CRM attributes bound to the control properties.
        // @ts-ignore
        var crmTagStringsAttribute = context.parameters.Tags.attributes.LogicalName;

        // @ts-ignore
        var crmTagStringsAttributeValue = Xrm.Page.getAttribute(crmTagStringsAttribute).getValue();
        var data = crmTagStringsAttributeValue.split(",");

        for (var i in data) {
            // Create controls
            // Tag element
            this.tagsElement = document.createElement("span");
            this.tagsElement.setAttribute("class", "badge badge-pill badge-primary");

            var ele = this.localContainer.appendChild(this.tagsElement);
            ele.innerHTML = data[i];

            // Space element
            this.spaceElement = document.createElement("span");

            var space = this.localContainer.appendChild(this.spaceElement);
            space.innerHTML = "  ";
        }
    }


	/**
	 * Called when any value in the property bag has changed. This includes field values, data-sets, global values such as container height and width, offline status, control metadata values such as label, visible, etc.
	 * @param context The entire property bag available to control via Context Object; It contains values as set up by the customizer mapped to names defined in the manifest, as well as utility functions
	 */
    public updateView(context: ComponentFramework.Context): void {
        // Add code to update control view

        // CRM attributes bound to the control properties.
        // @ts-ignore
        var crmTagStringsAttribute = this.localContext != null && this.localContext.parameters != null ? this.localContext.parameters.Tags.attributes.LogicalName : null;

        // @ts-ignore
        var crmTagStringsAttributeValue = crmTagStringsAttribute != null ? Xrm.Page.getAttribute(crmTagStringsAttribute).getValue() : "red,green,blue";
        var data = crmTagStringsAttributeValue.split(",");

        // Delete all elements first
        var tagCollection = this.localContainer.getElementsByTagName("span");
        var loopLength = tagCollection.length;
        for (var ti = 0; ti < loopLength; ti++) {
            this.localContainer.removeChild(tagCollection[0]);
        }

        // Add new tags
        for (var i in data) {
            // Create controls
            // Tag element
            this.tagsElement = document.createElement("span");
            this.tagsElement.setAttribute("class", "badge badge-pill badge-primary");

            var ele = this.localContainer.appendChild(this.tagsElement);
            ele.innerHTML = data[i];

            // Space element
            this.spaceElement = document.createElement("span");

            var space = this.localContainer.appendChild(this.spaceElement);
            space.innerHTML = "  ";
        }
    }

	/**
	 * It is called by the framework prior to a control receiving new data.
	 * @returns an object based on nomenclature defined in manifest, expecting object[s] for property marked as “bound” or “output”
	 */
    public getOutputs(): IOutputs {
        return {
            Tags: this.tagsString
        };
    }

	/**
	 * Called when the control is to be removed from the DOM tree. Controls should use this call for cleanup.
	 * i.e. cancelling any pending remote calls, removing listeners, etc.
	 */
    public destroy(): void {
        // remove the event handlers.
        this.refreshButton.removeEventListener("click", this.refreshClick);
    }

    /**
     * Custom Event Handlers
     */
    public refreshClick(evnt: Event): void {
        this.localNotifyOutputChanged();
    }
}
Customize UI using CSS
As you may have observed I have used class attributes on my HTML tags but that would not render unless I add the class definitions in the .css file
.badge-primary {
    color: #fff;
    background-color: #007bff;
}

.badge-pill {
    padding-right: 0.6em;
    padding-left: 0.6em;
    border-radius: 10rem;
}

.badge {
    display: inline-block;
    padding: 0.25em 0.4em;
    font-size: 75%;
    font-weight: bold;
    line-height: 1;
    color: #fff;
    text-align: center;
    white-space: nowrap;
    vertical-align: baseline;
    border-radius: 0.25rem;
}

button {
    text-rendering: auto;
    color: initial;
    letter-spacing: normal;
    word-spacing: normal;
    text-transform: none;
    text-indent: 0px;
    text-shadow: none;
    display: inline-block;
    text-align: start;
    margin: 0em;
    font: 400 13.3333px Arial;
}

.btn-sm {
    padding: 5px 10px;
    font-size: 12px;
    line-height: 1.5;
    border-radius: 3px;
}

.btn-default {
    color: #333;
    background-color: #fff;
    border-color: #ccc;
}

.btn {
    display: inline-block;
    padding: 6px 12px;
    margin-bottom: 0;
    font-size: 14px;
    font-weight: 400;
    line-height: 1.42857143;
    text-align: center;
    white-space: nowrap;
    vertical-align: middle;
    -ms-touch-action: manipulation;
    touch-action: manipulation;
    cursor: pointer;
    -webkit-user-select: none;
    -moz-user-select: none;
    -ms-user-select: none;
    user-select: none;
    background-image: none;
    border: 1px solid transparent;
    border-radius: 4px;
}

.glyphicon {
    position: relative;
    top: 1px;
    display: inline-block;
    font-family: 'Glyphicons Halflings';
    font-style: normal;
    font-weight: 400;
    line-height: 1;
    -webkit-font-smoothing: antialiased;
    -moz-osx-font-smoothing: grayscale;
}

.glyphicon-refresh:before {
    content: "\e031";
}
Build the project
Again, open Visual Studio command prompt and navigate to the folder where the index.ts file resides using cd command.
To build the package, run npm run build command as shown below.
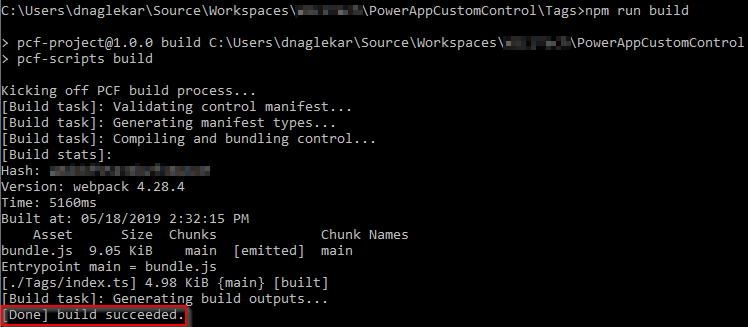
If the build is succeeded, then we can test it by running the control in a browser. To do so, you will need to use npm start command as shown below. In my case, as init() function needs an input to load I have hard-coded some default values to test.

When testing in the browser; screen might look something like this. In my case as I do not have any output sent back I don’t see anything in there but if you have output sent back from the control you’ll see your output variables values as well.

You can use debugger in your index.ts file and using F12 you can do a step-by-step debugging
Create a solution package for D365 CE
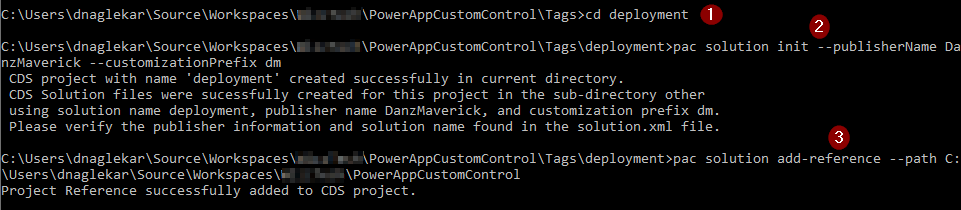
For this create a new directory inside your control folder. In my case I have created a folder named “deployment” inside the “Tags” folder.

Now, use cd command to navigate inside this newly created folder and run the following command to create a new solution project for D365 CE.
pac solution init --publisherName [publisher name] --customizationPrefix [publisher prefix]
For example, in my case the command was
pac solution init --publisherName DanzMaverick --customizationPrefix dm
Once the solution project is created we need to add the component into this solution. To do this, we need to use the following command. The path needs to be where the project file (pcfproj) resides
pac solution add-reference --path [path or relative path of your PowerApps component framework project on disk]
In my case the command was
pac solution add-reference --path C:\Users\dnaglekar\Source\Workspaces\xxx\PowerAppCustomControl
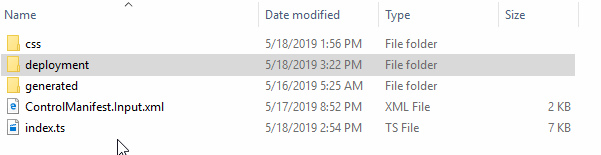
Once the above command is executed, you’ll see deployment.cdsproj created.

We now have to run few more commands to create the .zip file we need for importing the solution in D365 CE. To do so, we need to execute msbuild /t:restore command followed by msbuild command.


After running both the command, if you navigate to your “deployment” folder (bin->debug) you should see a .zip file created.
Import this solution zip file in any of your favorite D365 CE instance and publish customization.
Custom Control in D365 CE
Let’s look at how to configure the custom control in D365 CE. I have created a custom attribute called “Tag” on “Account” entity which contains comma-separated value. I am going to customized the form to add a control to this attribute.
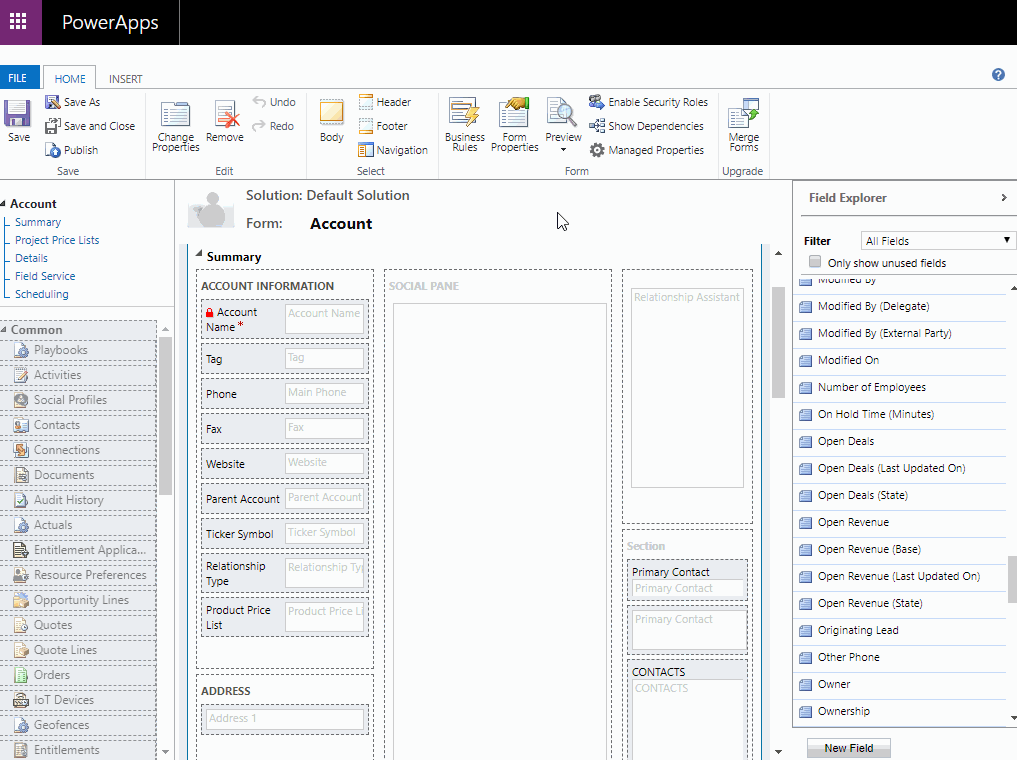
Once the form is customized and published; let’s navigate to the Account form and see the custom control in action.


Based on the data it created several tags. A basic custom control to give you a glimpse of what we can do with it.
Please leave a feedback or comment below. Thank you

I get an error every time I do the last step when creating the solution package. When I run the command “msbuild” I get the following message:
C:\Program Files (x86)\Microsoft Visual Studio\2017\Enterprise\MSBuild\15.0\bin
\Microsoft.Common.CurrentVersion.targets(2628,7): error MSB4057: The target “Cr
eateManifestResourceNames” does not exist in the project. [C:\PCF\TestControls\
TestControls.pcfproj]
This test project was created following the instructions documented here but none of the customizing. I have updated NPM and Node.js to the latest version and still get the error. Any ideas?
LikeLike
Are you executing the msbuild /t:restore and msbuild command under your deployment folder? Please make sure the path where you are executing the command is correct. Take a look at the following image http://bit.ly/2Kdqu0q
LikeLike
I found the issue. I had to restore .net within the project directory(s) first and then it was able to build properly within the solution project.
LikeLike
Hey Danish
Nice article and very helpful
I have one question when can we use dataset as component types
LikeLike
Hi Danish,
I am getting an error “Object doesn’t support property or method ‘localNotifyOutputChanged'”. Is this function missing your code or am I missing something.
Regards,
Pramod
LikeLike
That is a locally declared variable. Before the init() function you should declare some local variable. Look at a section named “Global Variables” which is above the section “init() function”
/**
* Local Variables
*/
private localContext: ComponentFramework.Context;
private localNotifyOutputChanged: () => void;
private localContainer: HTMLDivElement;
LikeLike
Hi Danish,
Is it possible to call custom action using PCF . Please suggest.
Thanks
LikeLike
You can call actions or functions using WebApi. Just make sure to turn on WebApi feature usage in Control Manifest file.
LikeLike
Webapi only exposes 5 methods and execute is not there now. so wondering if there is some other way .
LikeLike
You can call action or functions using Web Api. Sample code link – https://docs.microsoft.com/en-us/powerapps/developer/common-data-service/webapi/samples/functions-actions-client-side-javascript.
You can also use Jason Lattimer’s CRM Rest Builder solution – https://github.com/jlattimer/CRMRESTBuilder
LikeLike
Hi Danish,
I am trying to bind quote status to an input parameter with type OptionSet. But status is not showing in the options of entity fields. Realized that status has Datatype = Status which is system datatype.
Is there a way to get the Quote Status value?
I am looking at the Status Reason to bind instead. But binding this field is giving me issue also. Binding the OptionSet Input param to the Status Reason entity field is okay. But when I’m saving it, it shows me error message.
“Message: The type declared for property quotestatus (type OptionSet) doesn�t match the type of the bound attribute (type OptionSet)Detail: ”
Hope to get some input to you. Thanks.
— Euclides
LikeLike
I haven’t yet bonded a property to an OptionSet. I will look into it and will get back to you. Is there a way you can share code snippets?
LikeLike
i got an error message while using this article
Error occured during initialization of control:
Name.Tags.Message:’Xrm’ is not defined
LikeLike
Have you used “ts-ignore”?
LikeLike
yes i am using here is the code
public init(context: ComponentFramework.Context, notifyOutputChanged: () => void, state: ComponentFramework.Dictionary, container: HTMLDivElement) {
// Init local variables
this.localContext = context;
this.localNotifyOutputChanged = notifyOutputChanged;
this.localContainer = container;
// Register EventHandler
this.refreshClicked = this.refreshClick.bind(this);
// Refresh button
this.refreshButton = document.createElement(“button”);
this.refreshButton.setAttribute(“type”, “button”);
this.refreshButton.setAttribute(“value”, “Refresh”);
this.refreshButton.setAttribute(“class”, “btn btn-default btn-sm glyphicon glyphicon-refresh”);
this.refreshButton.addEventListener(“click”, this.refreshClick);
// Add elements to container
this.localContainer.appendChild(this.refreshButton);
// CRM attributes bound to the control properties.
// @ts-ignore
var crmTagStringsAttribute = context.parameters.Tags.attributes.LogicalName;
// @ts-ignore
var crmTagStringsAttributeValue = Xrm.Page.getAttribute(crmTagStringsAttribute).getValue();
var data = crmTagStringsAttributeValue.split(“,”);
for (var i in data) {
// Create controls
// Tag element
this.tagsElement = document.createElement(“span”);
this.tagsElement.setAttribute(“class”, “badge badge-pill badge-primary”);
var ele = this.localContainer.appendChild(this.tagsElement);
ele.innerHTML = data[i];
// Space element
this.spaceElement = document.createElement(“span”);
var space = this.localContainer.appendChild(this.spaceElement);
space.innerHTML = ” “;
}
}
LikeLike
Hi, the post was old and I found a better way to retrieve data. I have updated the post now.
Please replace your current code
// @ts-ignore
var crmTagStringsAttributeValue = Xrm.Page.getAttribute(crmTagStringsAttribute).getValue();
var data = crmTagStringsAttributeValue.split(“,”);
with
// @ts-ignore
var crmTagStringsAttributeValue = context.parameters.Tags.raw;
var data = crmTagStringsAttributeValue.split(“,”);
Let me know if that worked. Thanks.
LikeLike
Not Working
TS2531: Object is possibly ‘null’
this error appear when npm run build command run
LikeLike
Is it possible for you to share link to the code/repo? GitHub preferred.
LikeLike
https://github.com/Asgharlaal/CRM
LikeLike
Declare Xrm at the top where you use import
declare var Xrm: any;
You do not have to use @ts-ignore once you do that.
LikeLike
Know this error
TypeError: Unable to get property ‘Page’ of undefined or null reference
LikeLike
I am not getting any error while I download the solution and do npm install . Are you getting any error ?
LikeLike
Please Share your code
LikeLike
Hi Asghar,
I did not do anything in your code. Just had the npm install done after I downloaded your solution. However your solution did not contain package.json, tsconfig.json ,pcfconfig.js file, so I took them out of my own solution . Rest all same.
Thanks
LikeLike
Great article Danish! Immensely helpful!
LikeLike
hi danish,
thanks for the nice article
I am able to create a custom control successfully able to create a build import it into the dynamic CRM
also I have added the custom control in the field on a from
My question is that after binding control on-field, if anything I am writing on that field I am not able to save it in CRM, is there any way I can save it the CRM?
LikeLike
Sorry for a delayed response. To set the value from your control back to field you will have to use getOutputs() method.
LikeLike
Hi Danish,
i got an error when write command “pac pcf init –namespace DanzMaverick –name Tags –template field” that pac is not recognaized.
LikeLike
What is the error? Have you installed prerequisites?
LikeLike
Hi Danish,
While doing npm run build. I am getting below error.
Error in index.ts file
Generic Type ‘StandardControl’ requires 2 type of arguments
Generic Type ‘Context’ requires 1 type of argument
LikeLike
Hi Danish,
While doing npm run build. I am getting below error.
Error in index.ts file
Generic Type ‘StandardControl’ requires 2 type of arguments
Generic Type ‘Context’ requires 1 type of argument
LikeLike
The logs should also provide a line number where the error is. Can you share the code snippet where the logs are pointing at a possible error?
LikeLike
Thanks for your quick reply danish.
It shows error in index.ts with following lie.
(3,30)
(26,27)
(45,26)
(94,32)
Not sure if above are line number but it should this above number in bracket against each error.
LikeLike
Without the code it would be hard to determine the issue. Please share the code snippet as well.
LikeLike
Hi
i got error on this line during local context varibale initialization .
private localContext: ComponentFramework.Context so i changed to private localContext: ComponentFramework.Context;
After above change , facing issue in update view method .. its saying Tags doesnt exist on type IInputs
var crmTagStringsAttributeValue = context.parameters.Tags.raw != null ? context.parameters.Tags.raw : “red,green,blue”;
Could you please help?
LikeLike
Hi Danish,
During local variable initialization i got the error on below line
private localContext: ComponentFramework.Context;
Hence i have changed to private localContext: ComponentFramework.Context;
after above code change now getting error on updateview method
var crmTagStringsAttributeValue = context.parameters.Tags.raw != null ? context.parameters.Tags.raw : “red,green,blue”;
saying Property Tags doesnt exist on type IInputs.
LikeLike
This code was written using PCF CLI version 0.0.1 and new version has some syntax changes. I’ll update the code in the blog. Thanks for your inputs
LikeLike
Thanks Danish for your immediate response.
LikeLike
Hi Maverick,
We are unable to deploy power apps solution while using XrmToolBox. We are seeing the below error “No profiles were found on this computer. Please run “pac auth create” to create one”. Kindly help us resolve this issue.
LikeLike
When using “Quick Deploy” you will need authentication profiles created on that machine. To do that from the ribbon (menu) select “Authentication Profiles” > “Create Profile”. Provide your org URL. Once the command is successfully executed a profile will be created on that machine. Now you can use “Quick Deploy”.
LikeLike
Hi Maverick,
I am new to PCF. I have created a Org chart PCF component which works fine locally but looses it’s interactive part while using it in PowerApps. What might be the issue?
LikeLike
Its hard to tell without looking at the code. Please post this question on Microsoft Forums where you might get more help and insights. Thanks.
LikeLike