Well most of us have been configuring or rather not doing any configuration with authentication and have been using local authentication. But believe me if we spend more time configuring the Portal Authentication to use Azure AD B2C you will get more secure and more user management capabilities.
First thing you will need is Azure subscription. A free trial will give you access to $200 credit but you will need to provide credit card for verification purpose.
Login to Azure
Navigate to https://portal.azure.com. If you have multiple directories; you will need to be in the default directory.

Create Azure AD B2C
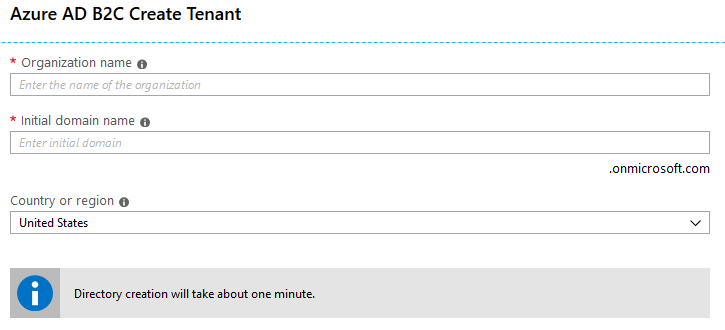
Click on “Create Resource” on the left-hand panel and search for “Azure Active Directory B2C”

Enter organization name, Initial domain name and select appropriate country.
Link Azure AD B2C to your current subscription
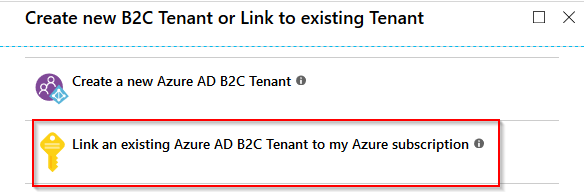
Once you are notified that the Azure AD B2C directory is created; click on “Create Resource” again and search for “Azure Active Directory B2C” (not intuitive). But now instead of clicking on “Create new Azure AD B2C tenant” you have to select “Link an existing Azure AD B2C tenant to my subscription”.
Select your newly created B2C tenant, select your subscription, select an existing resource group or you can create a new resource group.

Configure Azure AD B2C tenant
Now that the tenant is ready; let’s configure it for authentication flows.
Navigate to your newly created B2C tenant from “All Resources” option. Once you open you B2C resource you will get an option to open the settings – which will open in a new window. This is shown as below.

Create a new application by clicking on ‘Application’ and ‘Add’. Supply the name of the application.
Name your application so that you know the reason for which you created it
Once the application is created, now add a ‘Reply Url’ something like https://your-portal-domain.microsoftcrmportals.com/signin-azure-ad-b2c and in the App Id Uri type portal. Store the Reply Url as you will need it later.
| Setting | Value |
| Name | MyPortalApp |
| Include Web App/Web API | Yes |
| Allow implicit flow | Yes |
| Reply Url | https://your-portal-domain.microsoftcrmportals.com/signin-azure-ad-b2c |
| App ID Url | Add portal to a predefined URL |
| Native Client | No |

Once the application is created note down the Application Id – which will be used later while configuring the portal.
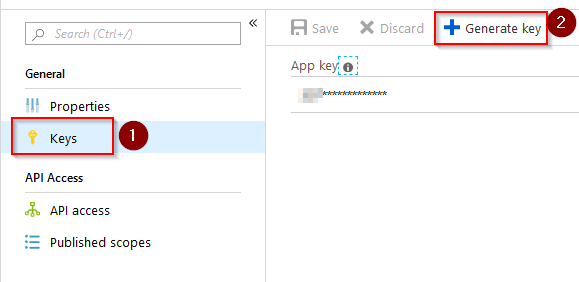
Now, click on generate key and save it in a secure place. You won’t be able to retrieve it later.
Now go back to Azure B2C overview page and select “User Flow”; click on “New Flow”. Select ‘Sign up and sign in” flow. Fill in all the needed details as mentioned in the table below.
| Settings | Value | Comments |
| Name | B2C_1_signupsignin | You can name it anything |
| Identity Provider | Email signup | |
| Multi-factor Auth | Disabled | You can enable it if you want |
For ‘User attributes and claims’ – click ‘Show more’ and select the following:

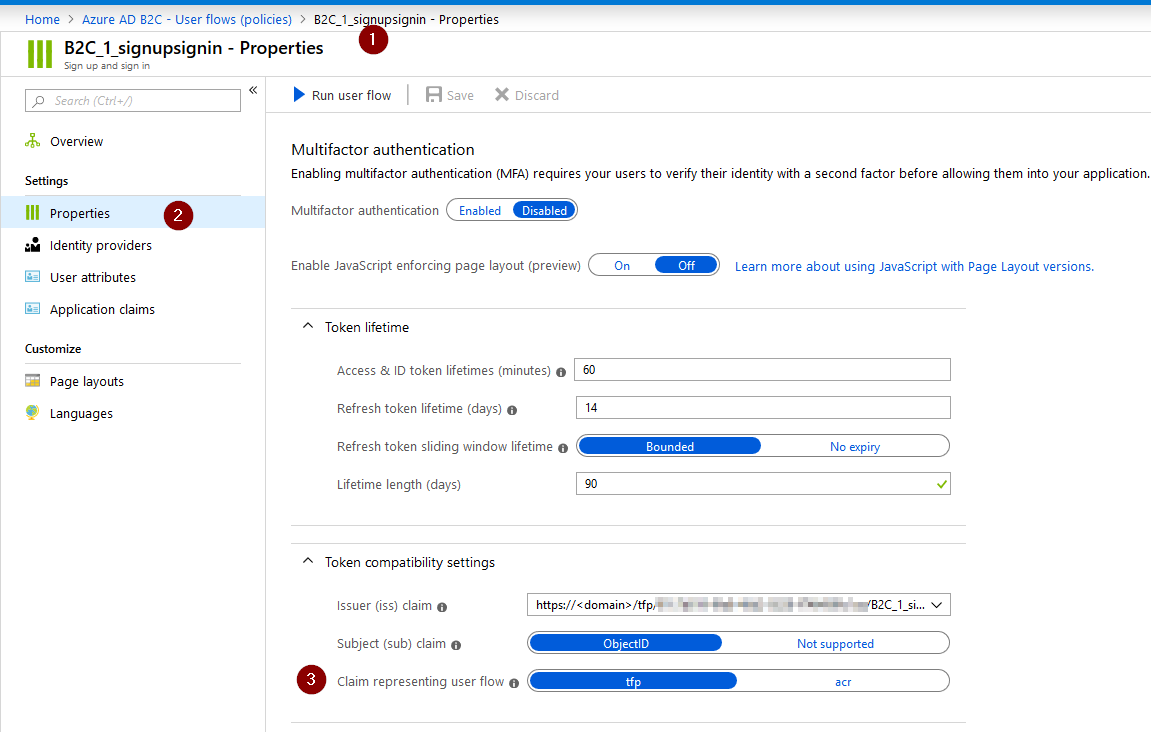
Click save and signup-signin policy will be created. Once it gets created, open it up to edit it. Select ‘Properties’ on this section and under ‘Token compatibility settings’ select the option for TFP. Click save. Once saved; click on ‘Run user flow’ and copy the issuer URL; you will need it later.


Let’s recap what we have so far.
- Reply Url
- Application Id
- App Key
- Issuer Url
Configure D365 Portal
Once your Azure AD B2C is ready let’s get your portal ready to accept the Azure AD B2C authentication settings,
Site Settings
Navigate to your site settings and review existing site settings as mentioned below.
| Settings | Value |
| Authentication/LoginTrackingEnabled | TRUE |
| Authentication/Registration/EmailConfirmationEnabled | TRUE |
| Authentication/Registration/LoginButtonAuthenticationType | <this will be the issuer Url from above> |
| Authentication/Registration/ProfileRedirectEnabled | TRUE |
Now, let’s add new settings for Azure AD B2C. Before you create these settings; confirm if they don’t already exists.
| Settings | Value |
| Authentication/OpenIdConnect/Azure AD B2C/RedirectUri | <this is your reply Url from above> |
| Authentication/OpenIdConnect/Azure AD B2C/ClientId | <this is your application id from above> |
| Authentication/OpenIdConnect/Azure AD B2C/Authority | <this is your Issuer Url from above> |
| Authentication/OpenIdConnect/Azure AD B2C/PostLogoutRedirectUri | <this is your portal Url where users will be redirected when they logout> |
We also need to define the claims mapping; what we are capturing on the signup form to be mapped over to CRM.
| Settings | Value |
| Authentication/OpenIdConnect/Azure AD B2C/LoginClaimsMapping | emailaddress1=http://schemas.xmlsoap.org/ws/2005/05/identity/claims/emailaddress,firstname=http://schemas.xmlsoap.org/ws/2005/05/identity/claims/givenname,lastname=http://schemas.xmlsoap.org/ws/2005/05/identity/claims/surname |
| Authentication/OpenIdConnect/Azure AD B2C/RegistrationClaimsMapping | emailaddress1=http://schemas.xmlsoap.org/ws/2005/05/identity/claims/emailaddress,firstname=http://schemas.xmlsoap.org/ws/2005/05/identity/claims/givenname,lastname=http://schemas.xmlsoap.org/ws/2005/05/identity/claims/surname |
Format for mapping claims: CRM_attribute1_name=Azure_claim1_Uri, CRM_attribute2_name=Azure_claim2_Uri
To know more about claims or if you want to map more claims please click here.
All the settings should be done. Now restart your portal and test the login as well as signup.

Hi Danish, thanks for the great article. Do you know if these steps work with the preview PowerApps Portals?
LikeLike
I haven’t tried it yet but I believe so it should work because it uses site settings and that’s all you would need to configure this.
LikeLike
I am unable to find the Site Settings in CRM Portal Side. Can you please help me.
LikeLike
If you can’t find the site settings then you can add them as described in the blog post. Hope this helps.
LikeLike